Set up WireGuard for VPN and exposing Homelab services

Wireguard is a modern and high-performance VPN. It’s free and easy to configure which makes it a popular choice for Homelab VPN. Except from hosting wireguard as a VPN service, it can also be used for connecting to internal services without exposing home public IP address.
Overview
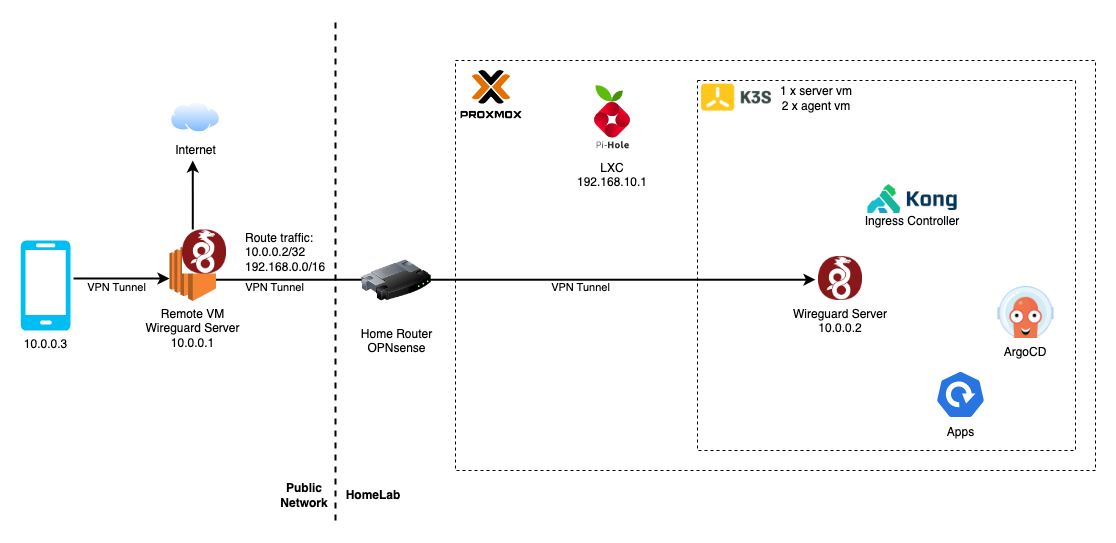
Wireguard works by connecting two peer devices with an encrypted tunnel by UDP protocol. In this case, there is an EC2 instance with a static public IP. It is the entrypoint where all my client devices (phone, tablet) connecting to. The EC2 wireguard instance also has a constant connection with a peer running in the homelab. Since the homelab wireguard initiates the connection, homelab public IP is hidden from wireguard configuration.
By using iptable, EC2 wireguard can either have traffic passthrough like a normal VPN service, or proxy private IP traffic to its homelab peer.
Step by Step
Generate wireguard key pair
Generate the key pairs locally and store securely.
1
2
3
4
5
6
7
8
9
10
11
wg genkey > remote_private
wg pubkey < remote_private > remote_public
chmod 077 remote_private

wg genkey > homelab_private
wg pubkey < homelab_private > homelab_public
chmod 077 homelab_private

wg genkey > device_private
wg pubkey < device_private > device_public
chmod 077 device_private
For each device connecting to VPN, a set of private and public key needs to be generated. It’s the annoying thing about using wireguard that every time adds a new client, server config needs to update with the new public key and restart.
Plan IP ranges
Wireguard operates on a new network interface on clients, so it needs a dedicated IP range. In my case, home router is on 192.168.0.0/16 and wireguard is on 10.0.0.0/24.
Configure Remote Instance
Understand your environment and os release first. Then find a guide on the internet for installing wireguard on your system. e.g. this one from digital ocean.
1
2
3
4
5
6
7
8
9
10
11
12
13
14
15
16
17
18
19
20
21
22
23
24
25
26
# check your os release
cat /etc/os-release
# in my case
# PRETTY_NAME="Debian GNU/Linux 11 (bullseye)"
# NAME="Debian GNU/Linux"
# VERSION_ID="11"
# VERSION="11 (bullseye)"
# VERSION_CODENAME=bullseye
# ID=debian
# HOME_URL="https://www.debian.org/"
# SUPPORT_URL="https://www.debian.org/support"
# BUG_REPORT_URL="https://bugs.debian.org/"

# install wireguard
sudo apt update
sudo apt install wireguard

# create config file
sudo vi /etc/wireguard/wg0.conf

# enable ip_forward for ipv4
sudo sysctl -w net.ipv4.ip_forward=1 && sudo  sysctl -w net.ipv4.conf.all.forwarding=1
sudo sysctl -p

# start wireguard
wg-quick up wg0
Sample Remote Instance Wireguard Config
1
2
3
4
5
6
7
8
9
10
11
12
13
14
15
16
17
18
19
20
21
[Interface]
PrivateKey = <remote private key>
Address = 10.0.0.1/24
# default is 51820 but you can use a different port
ListenPort = 51822
DNS = 1.1.1.1,8.8.8.8
# add rule after start wireguard to proxy traffic
# make sure eth0 is the name of the external ip interface
PostUp = iptables -A FORWARD -i wg0 -j ACCEPT; iptables -t nat -A POSTROUTING -o eth0 -j MASQUERADE
# remove rule, clean up after stopping wireguard
PostDown = iptables -D FORWARD -i wg0 -j ACCEPT; iptables -t nat -D POSTROUTING -o eth0 -j MASQUERADE

[Peer]
# Name = homelab
PublicKey = <homelab public key>
AllowedIPs = 10.0.0.2/32, 192.168.0.0/16

[Peer]
# Name = device
PublicKey = <device public key>
AllowedIPs = 10.0.0.3/32
Here is a chatGPT explaination of the iptable commands:
The two commands you’ve provided are used to configure the firewall rules on a Linux system using the iptables utility. They control network traffic forwarding and Network Address Translation (NAT) to achieve specific networking goals. Let’s break down each command:
iptables -A FORWARD -i wg0 -j ACCEPT:
iptables: This is the command-line tool used to manage the netfilter firewall rules in Linux. It allows you to define and manipulate packet filtering and network address translation rules.
-A FORWARD: This part of the command specifies that the rule is intended for the “FORWARD” chain. The FORWARD chain is responsible for handling packets that are being forwarded between different network interfaces (e.g., from one interface to another).
-i wg0: This option specifies the input network interface for the rule. In this case, the rule applies to packets coming in from the “wg0” interface. “wg0” is typically associated with WireGuard, which is a modern VPN protocol.
-j ACCEPT: This is the target action for the rule. When the conditions specified in the rule are met, the action “ACCEPT” allows the packets to pass through the firewall. Essentially, this rule permits forwarding of packets from the “wg0” interface to other interfaces.
iptables -t nat -A POSTROUTING -o eth0 -j MASQUERADE:
-t nat: This option specifies that the rule should be added to the “nat” table. The “nat” table is used to handle Network Address Translation (NAT) rules, which allow a router to modify the source or destination address of packets as they pass through.
-A POSTROUTING: Similar to the first command, this part of the command specifies that the rule is intended for the “POSTROUTING” chain. The POSTROUTING chain is executed after routing decisions have been made, just before the packet leaves the system.
-o eth0: This option specifies the output network interface for the rule. In this case, the rule applies to packets going out through the “eth0” interface. “eth0” is a common designation for a physical Ethernet interface.
-j MASQUERADE: This is the target action for the rule. The action “MASQUERADE” is used to perform Source NAT (SNAT), which means that the source IP address of outgoing packets on the “eth0” interface will be replaced with the IP address of the “eth0” interface itself. This is often used when you want a local network to share a single public IP address for outbound internet access.
In summary, the two commands work together to allow packets coming in from the “wg0” WireGuard interface to be forwarded to other interfaces while also performing NAT on outgoing packets from the “eth0” interface, ensuring that they appear to come from the system’s own IP address. This is a common setup for VPN servers, enabling them to forward and route traffic between the VPN clients and the external network.
Configure Homelab Instance
Installing and configure wiregard is pretty much the same steps as the remote instance. Here is a sample wireguard config for the homelab instance
1
2
3
4
5
6
7
8
9
10
11
12
13
14
[Interface]
Address = 10.0.0.2/32
ListenPort = 51820
# you can either set private key here or use `wg set`
PostUp = wg set wg0 private-key /etc/wireguard/privatekey; iptables -A FORWARD -i wg0 -j ACCEPT; iptables -t nat -A POSTROUTING -o eth0 -j MASQUERADE
PostDown = iptables -D FORWARD -i wg0 -j ACCEPT; iptables -t nat -D POSTROUTING -o eth0 -j MASQUERADE

[Peer]
# Name = remote
PublicKey = <remote public key>
# allow traffic on wireguard ip range
AllowedIPs = 10.0.0.0/24
Endpoint = <public ip of remote vm>:51822
PersistentKeepalive = 15
Connect VPN Client
Setting up mobile client is much easier. Download a wireguard client and it can load config from a QR code which can be generated from sites like wireguard tools. Here is a sample config.
1
2
3
4
5
6
7
8
9
10
11
[Interface]
PrivateKey = <device private key>
Address = 10.0.0.3/32
ListenPort = 51822

[Peer]
# Name = remote
PublicKey = <remote public key>
AllowedIPs = 0.0.0.0/0
Endpoint = <public ip of remote vm>:51822
PersistentKeepalive = 15
Troubleshooting
1
2
3
4
5
6
7
8
9
# check wireguard interface status
sudo wg

# restart wireguard
wg-quick down wg0
wg-quick up wg0

# ping peers
ping 10.0.0.1
Reference
This is a similar design of this post https://blog.cavelab.dev/2021/03/vps-wireguard-iptables/. Thanks Cavelab for the inspiration.
https://github.com/pirate/wireguard-docs