HomeLab 2.0
One day I came across a post on r/selfhosted, and felt related instantly. That’s also when I just moved to a bigger place, which gives me a lot more space and flexibility to set up my router, switch and access point in the house. However, after checking all the ethernet sockets, I realized how clueless whoever designed and built my ethernet wiring. I had to hire a technician to come and investigate how all the sockets are connected and mount an access point for me. But that’s another story.

After getting a basic router -> switch -> access point up and running, I can finally start planning how to make my homelab a reality.
So what happened in homelab 1.0
To begin my homelab journey, I ordered a mini fanless PC from Taobao. It has a N5105 processor with 8GB of RAM. The spec is higher than my mac in college so it feels quite capable. Given it’s my first attempt, I didn’t want to overload it. So I installed an Ubuntu server image and just deployed docker containers directly on it.
It could handle the load when I just had potainer, home media stack (Jellyfin, Radarr, Transmissn, etc.) and a few other containers. I also added an extra hard drive for media storage. The video streaming was slow sometimes. Especially when loading a large movie file or skipping forwards.
It was when I experimented with CoreDNS and pi-hole which later became the last straw. I redirected all DNS queries in my home network to the poor dude and it finally gave up. None of the web GUI was responsive and I couldn’t SSH into the machine. I probably should have applied some deployment strategy but I guess testing in PROD is part of the fun of having a homelab. Luckily I had something better planned.

Enter Kubernetes
Kubernetes became really popular in the first few years of my career. I am now also working with it on a daily basis. So I have to include it in my homelab journey. Plus, it would be something to brag in front my nerdy friends.
After my mini PC gave up, I rebuild it into a router using OPNSense. There is also a PC laying around since it turns out I am not a big PC gamer. So I decided to refactor it into my homelab server. I’ve seen people saying it’s not a good practice to use consumer hardwares for self-hosting since they are not built for long running workload. But for me, it makes sense to not have to invest more money and I just need to be more careful of not running critical workload and storing files on it.
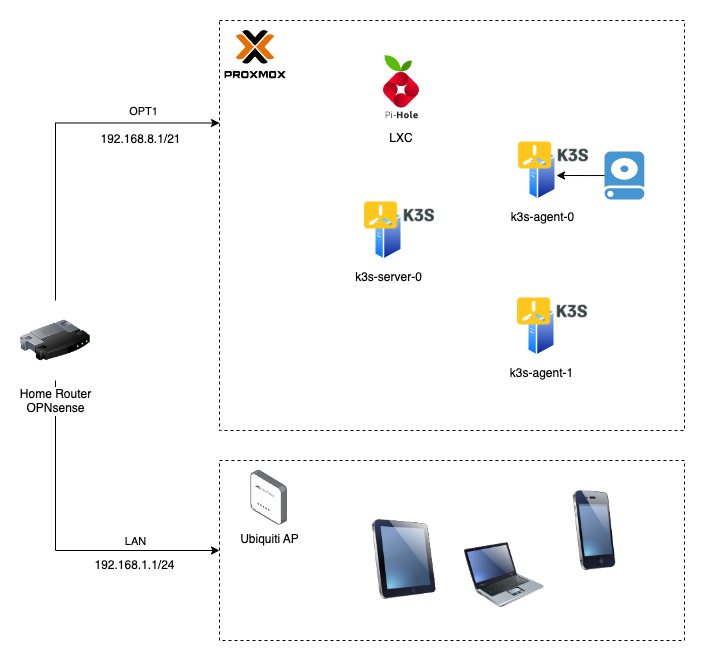
I picked the most common homelab tech to deploy on my server. For the most fundamental parts, Proxmox for virtualization and K3S for kubernetes distribution.
Hardware Sizing
My server has a AMD Ryzen 5 5600G processor (6 Cores, 12 Threads) and 32GB of RAM which is shared between:
| Name | Type | CPU Cores | RAM |
|---|---|---|---|
| pihole | lxc | 1 | 512MB |
| k3s-server-0 | vm | 2 | 4GB |
| k3s-agent-0 | vm | 4 | 12GB |
| k3s-agent-1 | vm | 4 | 8GB |
For storage, I attached a 4TB hard drive and use Proxmox to pass it to k3s-agent-0. This can be done from proxmox console or command line. It means all pods requiring a large volume need to be assigned to k3s-agent-0, which I use kustomize to add a node selector field on all required deployment objects. This is only good for a short term solution as all the media pods and database pods are running on the same node. The memory usage on that VM is approaching 8GB limit. So I have to consider PVC and upgrade to network drive very soon.

1
2
3
4
5
6
7
8
patches:
  - target:
      kind: Deployment
    patch: |-
      - op: add
        path: /spec/template/spec/nodeSelector
        value:
          use: media
Reference: